ShinyApp域名、端口、安全设置及代理
简介
前面我将 ShinyApp部署在阿里云上,阿里云只提供ip,不方便记忆,需要我们自己购买域名,为了方便后续域名解析绑定,所以我在阿里云又购买了域名bnapus-zju.com。域名的解析以及绑定在阿里云上十分简单,这里就不细讲了。下面就是讲一下如何使用Nginx反向代理以及使用HTTPS来保护ShinyApp。
Nginx反向代理
Shiny-server默认使用的端口是3838,所以每次访问ShinyApp需要在域名后面加上3838端口,很麻烦,我们希望每次访问的时候不用写特定的端口,有两种方法解决:
-
直接将Shiny-server默认端口设置为80:修改/etc/shiny-server/shiny-server.conf,将listen 3838改为listen 80,重启Shiny-server即可。80是HTTP默认端口,所以我们无须指定此端口,但是这有个弊端,就是占用了该端口,其它应用就无法使用该端口了,后面还得指定端口来访问其它应用,每次只能有一个服务使用端口80,所以此方法不建议使用
-
Nignx反向代理,这是我们推荐使用的方法
什么是反向代理?想象一下将服务器比作一幢大房子,有很多门(端口),你想要进入特定的空间就需要打开特定的门(端口),比如Shiny-server是在门(端口)3838后面,想要访问Shiny-server就需要打开门3838,RStudio-server默认在门(端口)8080后面:
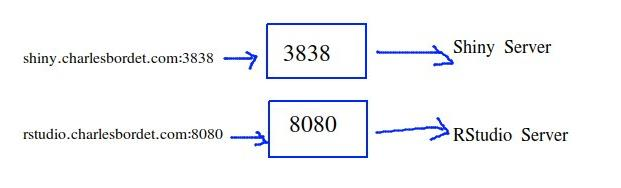
如果你敲门(端口)3322,是没有回应的。想要准确访问某个应用,就必须打开对的门(端口)。比如如果需要访问我部署在阿里云的网站BnaSNPDB(https://bnapus-zju.com:3838/bnasnpdb),需要在域名后面加上3838端口才能访问,这十分不美观以及不方便记忆。
因此,如果在房子里有一个门卫,可以带领你到你需要的门去,你就无需去对的门,直接问门卫就可以,它会将你带到正确的地方去,这个门卫就是反向代理。Nginx是最好的反向代理工具。
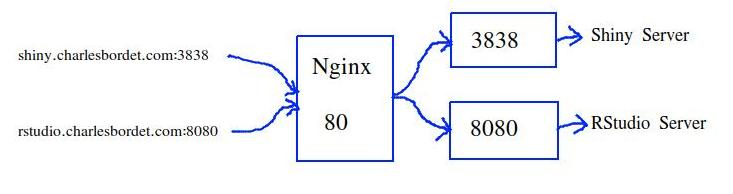
你可以直接输入bnapus-zju.com然后交给Nginx,Nginx知道你要访问Shiny-server,它会直接抓取对应的服务然后返回给你。
安装Nginx:
$ sudo apt install nginx
配置Nginx
cd /etc/nginx/sites-available
sudo vi shiny.conf
添加配置信息:
server {
    # listen 80 means the Nginx server listens on the 80 port.
    listen 80;
    listen [::]:80;
    # Replace it with your (sub)domain name.
    server_name bnapus-zju.com;
    # The reverse proxy, keep this unchanged:
    location / {
        proxy_pass http://localhost:3838;
        proxy_redirect http://localhost:3838/ $scheme://$host/;
        proxy_http_version 1.1;
        proxy_set_header Upgrade $http_upgrade;
        proxy_set_header Connection $connection_upgrade;
        proxy_read_timeout 20d;
        proxy_buffering off;
    }
}
这里我们将80端口给了Nginx,这样门卫只需要守在80端口就行,Nginx就可以进行反向代理。location里面是反向代理设置,指令门卫如何工作,这里如何我们输入bnapus-zju.com,Nginx会导向到3838端口,如果需要配置RStudio-server反向代理,可以添加rstudio.conf,只需要修改server_name以及port端口。
最后再设置一下软连接就行了
$ cd ../sites-enabled
$ sudo ln -s ../sites-available/shiny.conf .
Nginx不会访问sites-available文件夹,只会访问sites-enabled文件夹,我们通过设置软链接,后面如果需要切断这个反向代理只需要删除软连接就行,无需删除配置文件。最后重启激活Nginx:
$ sudo nginx -t
nginx: the configuration file /etc/nginx/nginx.conf syntax is ok
nginx: configuration file /etc/nginx/nginx.conf test is successful
确保配置文件正确,如果你遇到错误:nginx: [emerg] unknown "connection_upgrade" variable,则是由于$http_upgrade以及$connection_upgrade不存在导致的,这种情况下,修改/etc/nginx/nginx.conf即可,在http区块添加下面命令:
map $http_upgrade $connection_upgrade {
    default upgrade;
    '' close;
}
再验证激活:
$ sudo nginx -t
$ sudo systemctl restart nginx
别忘了将云服务器的80端口打开
现在我所有的ShinyApp都可以通过http://bnapus-zju.com/bnasnpdb 以及http://bnapus-zju.com/gwas 访问了
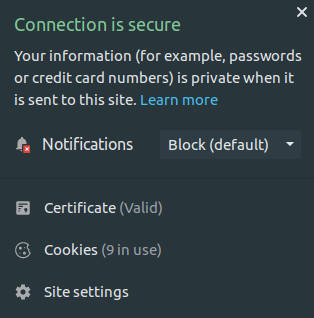
设置HTTPS
HTTP不是很安全,而且浏览器会提示
如今任何人都可以使用HTTPS,安全版的HTTP,下面主要讲四点:
- 为什么我们需要HTTPS
- 如何通过Let’s Encrypt获取SSL/TLS证书
- 如何在服务器上安装证书
- 强制性HTTPS
什么是HTTPS
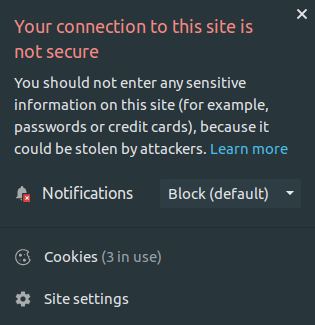
想象一下每次你访问一个网站,需要发送一个请求到数据中心,然后这个请求会携带你访问的网页返回给你,通过浏览器展示出来,这些信息会在各个路由器中中转直到目的地,如果你使用的是HTTP,信息是没有被加密的,意味着任何人都可以拦截,打开,读取甚至修改这些信息,然后在无人指导的情况下返回给你:
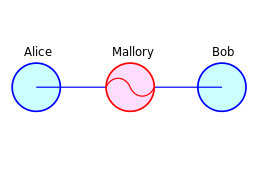
这称为 Man-in-the-Middle攻击。如果你的请求包含了一些敏感信息,比如你的密码,数据或者银行卡信用卡号码等等,就不怎么安心了。
因此我们想升级为HTTPS,HTTPS保证这些信息是加密的。使用HTTPS需要SSL/TLS证书以及秘钥
创建Let’s Encrypt证书
这里我们利用Let’s Encrypt获取免费证书,而且自动化。因为Let’s Encrypt证书有效期是3个月,3个月后需要更新。后面会讲如何自动更新证书。
首先前往网站 Certbot获取安装指导:

$ sudo apt-get update
$ sudo apt-get install software-properties-common
$ sudo add-apt-repository universe
$ sudo add-apt-repository ppa:certbot/certbot
$ sudo apt-get update

$ sudo apt-get install certbot python-certbot-nginx
获取证书:
sudo certbot certonly --nginx -d bnapus-zju.com
别忘了替换成你自己的域名,另外域名没被解析是无法生成证书的
生成结果:
Renewing an existing certificate
Performing the following challenges:
http-01 challenge for bnapus-zju.com
Waiting for verification...
Cleaning up challenges

IMPORTANT NOTES:
 - Congratulations! Your certificate and chain have been saved at:
   /etc/letsencrypt/live/bnapus-zju.com/fullchain.pem
   Your key file has been saved at:
   /etc/letsencrypt/live/bnapus-zju.com/privkey.pem
   Your cert will expire on 2021-03-23. To obtain a new or tweaked
   version of this certificate in the future, simply run certbot
   again. To non-interactively renew *all* of your certificates, run
   "certbot renew"
最重要的是就是记住生成的证书以及秘钥是在/etc/letsencrypt/live/bnapus-zju.com文件夹中,后面我们需要使用
安装证书
HTTP默认监听80端口,HTTPS则是443端口,1024后的端口是免费的。这里我们修改Nginx端口为443
sudo vi /etc/nginx/sites-available/shiny.conf
修改端口
# listen 443 means the Nginx server listens on the 443 port.
listen 443 ssl http2;
listen [::]:443 ssl http2;
配置证书
可以使用Mozilla的 SSL配置生成器,将下面信息添加到配置文件中:
# certs sent to the client in SERVER HELLO are concatenated in ssl_certificate
ssl_certificate /path/to/signed_cert_plus_intermediates;
ssl_certificate_key /path/to/private_key;
ssl_session_timeout 1d;
ssl_session_cache shared:MozSSL:10m;  # about 40000 sessions
ssl_session_tickets off;

# curl https://ssl-config.mozilla.org/ffdhe2048.txt > /path/to/dhparam.pem
ssl_dhparam /path/to/dhparam.pem;

# intermediate configuration
ssl_protocols TLSv1.2 TLSv1.3;
ssl_ciphers ECDHE-ECDSA-AES128-GCM-SHA256:ECDHE-RSA-AES128-GCM-SHA256:ECDHE-ECDSA-AES256-GCM-SHA384:ECDHE-RSA-AES256-GCM-SHA384:ECDHE-ECDSA-CHACHA20-POLY1305:ECDHE-RSA-CHACHA20-POLY1305:DHE-RSA-AES128-GCM-SHA256:DHE-RSA-AES256-GCM-SHA384;
ssl_prefer_server_ciphers off;

# HSTS (ngx_http_headers_module is required) (63072000 seconds)
add_header Strict-Transport-Security "max-age=63072000" always;

# OCSP stapling
ssl_stapling on;
ssl_stapling_verify on;

# verify chain of trust of OCSP response using Root CA and Intermediate certs
ssl_trusted_certificate /path/to/root_CA_cert_plus_intermediates;
这里我们需要修改一些内容,前两行的ssl_certificate以及ssl_certificate_key需要替换成自己的证书信息,我的修改为:
# certs sent to the client in SERVER HELLO are concatenated in ssl_certificate
ssl_certificate /etc/letsencrypt/live/bnapus-zju.com/fullchain.pem;
ssl_certificate_key /etc/letsencrypt/live/bnapus-zju.com/privkey.pem;
下载DH参数
$ curl https://ssl-config.mozilla.org/ffdhe2048.txt > /home/shiny/script/dhparam.pem
然后修改ssl_dhparam
ssl_dhparam /home/shiny/script/dhparam.pem;
HSTS部分用来告诉浏览器从现在开始只使用HTTPS访问此域名,不再允许使用HTTP
使用Let’s Encrypt证书
最后一步,最后一行修改如下:
ssl_trusted_certificate /etc/letsencrypt/live/bnapus-zju.com/chain.pem;
最后我的shiny.conf如下(供参考):
server {
    listen 80;
    listen [::]:80;

    # redirect all HTTP requests to HTTPS with a 301 Moved Permanently response.
    return 301 https://$host$request_uri;
}

server {
    # listen 443 means the Nginx server listens on the 443 port.
    listen 443 ssl http2;
    listen [::]:443 ssl http2;
    # Replace it with your (sub)domain name.
    server_name bnapus-zju.com;
    # The reverse proxy, keep this unchanged:
    location / {
        proxy_pass http://localhost:3838;
        proxy_redirect http://localhost:3838/ $scheme://$host/;
        proxy_http_version 1.1;
        proxy_set_header Upgrade $http_upgrade;
        proxy_set_header Connection $connection_upgrade;
        proxy_read_timeout 20d;
        proxy_buffering off;
    }


# certs sent to the client in SERVER HELLO are concatenated in ssl_certificate
ssl_certificate /etc/letsencrypt/live/bnapus-zju.com/fullchain.pem;
ssl_certificate_key /etc/letsencrypt/live/bnapus-zju.com/privkey.pem;
ssl_session_timeout 1d;
ssl_session_cache shared:MozSSL:10m;  # about 40000 sessions
ssl_session_tickets off;

# curl https://ssl-config.mozilla.org/ffdhe2048.txt > /path/to/dhparam.pem
ssl_dhparam /home/shiny/script/dhparam.pem;

# intermediate configuration
ssl_protocols TLSv1.2 TLSv1.3;
ssl_ciphers ECDHE-ECDSA-AES128-GCM-SHA256:ECDHE-RSA-AES128-GCM-SHA256:ECDHE-ECDSA-AES256-GCM-SHA384:ECDHE-RSA-AES256-GCM-SHA384:ECDHE-ECDSA-CHACHA20-POLY1305:ECDHE-RSA-CHACHA20-POLY1305:DHE-RSA-AES128-GCM-SHA256:DHE-RSA-AES256-GCM-SHA384;
ssl_prefer_server_ciphers off;

# HSTS (ngx_http_headers_module is required) (63072000 seconds)
add_header Strict-Transport-Security "max-age=63072000" always;

# OCSP stapling
ssl_stapling on;
ssl_stapling_verify on;

# verify chain of trust of OCSP response using Root CA and Intermediate certs
ssl_trusted_certificate /etc/letsencrypt/live/bnapus-zju.com/chain.pem;
}
验证一下配置文件是否存在错误:
sudo nginx -t
应该可以得到如下信息:
nginx: the configuration file /etc/nginx/nginx.conf syntax is ok
nginx: configuration file /etc/nginx/nginx.conf test is successful
重启Nginx
sudo systemctl restart nginx
现在可以HTTPS访问我的ShinyApp了,https://bnapus-zju.com/bnasnpdb 以及 https://bnapus-zju.com/gwas
自动更新的话可以使用Certbot,安装Certbot,运行
sudo certbot renew --dry-run
Certbot会自动检测证书是否可期,过期前几天会自动生成新的证书。
参考:https://www.charlesbordet.com/en/guide-shiny-aws/#6-extra-secure-your-app-with-https